
本篇文章更新時間:2019/02/16
如有資訊過時或語誤之處,歡迎使用 Contact 功能通知或向一介資男的 LINE 社群反應。
如果本站內容對你有幫助,歡迎贊助支持 。
這功能最開始的時候就寫在 FB2WP 臉書同步文章回 WordPress 的外掛裡,當時概念是讓外掛支援把 Facebook 上傳的照片也備份回網站,然後取第一張當文章特色圖片。
這次又因為在優化客戶網站的過程中有這需求,乾脆就整理起來變成 snippet 程式碼片段當個小功能,結合使用 自訂欄位 功能,把放在遠端的圖片抓回來塞在特色圖片裡。
本篇內容比較偏向開發者的土炮記錄,實際上應該不會有人用沒這麼完整的功能吧XD 要整合介面完整功能的外掛可以參考Post Thumbnail from URL 這款。
程式碼如下:
//functions.php
function mxp_set_remote_image_to_post_thumbnail($post_id) {
    $link = get_post_meta($post_id, 'mxp-remote-image', true);
    if (filter_var($link, FILTER_VALIDATE_URL) === FALSE) {
        return false;
    }
    if (!has_post_thumbnail($post_id)) {
        require_once ABSPATH . 'wp-admin/includes/media.php';
        require_once ABSPATH . 'wp-admin/includes/file.php';
        require_once ABSPATH . 'wp-admin/includes/image.php';
        $filename = basename(parse_url($link, PHP_URL_PATH));
        $upload_file = wp_upload_bits($filename, null, file_get_contents($link));
        if (!$upload_file['error']) {
            $wp_filetype = wp_check_filetype($filename, null);
            $attachment = array(
                'post_mime_type' => $wp_filetype['type'],
                'post_parent' => $post_id,
                'post_title' => preg_replace('/.[^.]+$/', '', $filename),
                'post_content' => $filename,
                'post_status' => 'inherit',
            );
            $attachment_id = wp_insert_attachment($attachment, $upload_file['file'], $post_id);
            if (!is_wp_error($attachment_id)) {
                //產生附加檔案中繼資料
                $attachment_data = wp_generate_attachment_metadata($attachment_id, $upload_file['file']);
                wp_update_attachment_metadata($attachment_id, $attachment_data);
                //將圖像的附加檔案設為特色圖片
                $type = explode("/", $wp_filetype['type']);
                if ($type[0] == 'image') {
                    set_post_thumbnail($post_id, $attachment_id);
                }
            }
        }
        return $attachment_id;
    } else {
        return false;
    }
}
add_action('save_post', 'mxp_set_remote_image_to_post_thumbnail', 10, 1);
Gist: link
使用方式
- 將上面這段程式碼寫在佈景主題中的
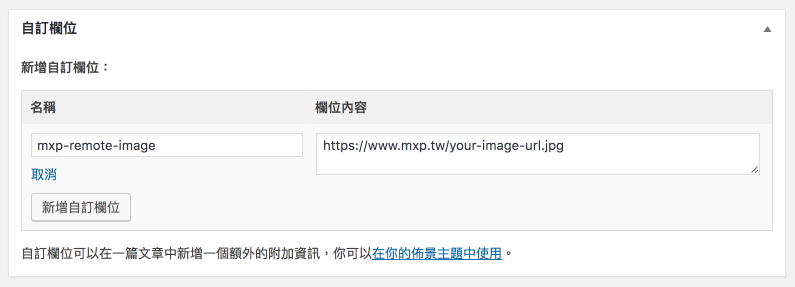
functions.php檔案最後,然後就...好了! - 接下來開一篇文章,將上方「顯示選項」中的「自訂欄位」打勾
- 新增自訂欄位,名稱輸入
mxp-remote-image,欄位內容輸入你想要偷抓的圖片連結 - 按下「發表」,程式就會把那張圖給抓來放在特色圖片裡囉~
如果因為 file_get_contents() 方法無法正確抓取圖片,可以改採用下列方式。
function file_get_contents_curl($url) {
    $ch = curl_init();
    curl_setopt($ch, CURLOPT_AUTOREFERER, TRUE);
    curl_setopt($ch, CURLOPT_HEADER, 0);
    curl_setopt($ch, CURLOPT_RETURNTRANSFER, 1);
    curl_setopt($ch, CURLOPT_URL, $url);
    curl_setopt($ch, CURLOPT_FOLLOWLOCATION, TRUE);
    $data = curl_exec($ch);
    curl_close($ch);
    return $data;
}
Ref: Link
而 WordPress 還有另一種 上傳圖片 方式(僅接受圖片)可以參考下列。
function awesome_function($file, $post_id) {
    require_once(ABSPATH . 'wp-admin' . '/includes/image.php');
    require_once(ABSPATH . 'wp-admin' . '/includes/file.php');
    require_once(ABSPATH . 'wp-admin' . '/includes/media.php');
    // upload image to server
    media_sideload_image($file['url'], $post_id);
    // get the newly uploaded image
    $attachments = get_posts( array(
        'post_type' => 'attachment',
        'number_posts' => 1,
        'post_status' => null,
        'post_parent' => $post_id,
        'orderby' => 'post_date',
        'order' => 'DESC',)
    );
    // returns the id of the image
    return $attachments[0]->ID;
}
Ref: Link
作法為直接先交由內建方法抓取檔案後並指派關聯文章,如果要應用在這篇,寫法上就要稍微調整一下了。