
內容簡介
此外掛是 WordPress「自訂選單」小工具的強化版本。
它提供了對 WP 的 wp_nav_menu() 函式中大多數可用參數的完全控制,並且提供了預篩選選單項目的功能,以便選擇自訂選單的特定部分。它還自動添加了一些自訂類別,並提供了一個短代碼,讓您可以在內容中包含這個小工具的輸出。
重要提示!此外掛沒有任何用於前端樣式的元素!輸出的最終外觀取決於您和您的佈景主題,如果您只是想要重新設計選單,那麼很抱歉,此外掛將無法實現。
其功能包括:
顯示整個菜單、一部分的菜單、特定層級的菜單,甚至只是菜單中的特定項目!
基於特定菜單項目或當前菜單項目(當前顯示的頁面)選擇一個子樹
指定相對或絕對層級開始以及輸出的層級數量
包含祖先(含自己)及其兄弟項目
排除某些選單項目或層級
使輸出條件根據不同階段的篩選選擇選項是否包含當前菜單項目
自動向輸出菜單項目添加 cmw-level-N 和 cmw-has-submenu 類別
允許輸入但不輸出小工具標題,或從當前選單項目或選擇的子樹項目設置標題
選擇分層或平面輸出,兩個選擇還是遵守指定的輸出層級數量
指定自訂類別用於小工具區塊、菜單容器和菜單本身
使用額外的 HTML 繞行鏈接文字和/或鏈接元素本身來修改鏈接的輸出
使用有序列表(OL)而不是無序列表(UL)顯示頂級和/或子級
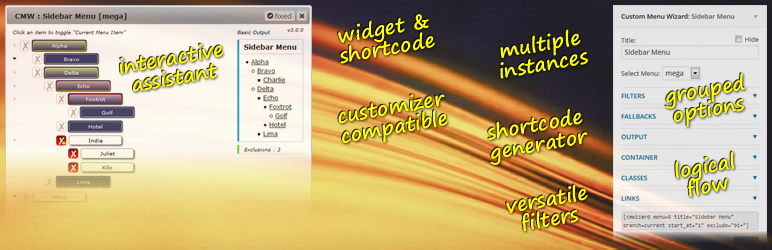
可用的短代碼 [cmwizard] 可在內容中運行小工具
短代碼可以引用小工具實例,使得維護多個相同或非常相似的短代碼實例變得更加容易
互動式「輔助」,幫助設置小工具和/或指定短代碼
實用工具,用於查找包含此外掛短代碼的文章
指定在某些情況下使用的替代配置(雙場景功能)
小工具選項的當前文檔可以在 Other Notes 中找到。
相關的短代碼屬性在 Installation 中文件化。
您可能會發現這裡的文檔被截斷了,因此我複製了 readme.txt 作為 cmw-doc.html。這個文件現在也包括在插件下載包中,並從管理插件頁面上的 Custom Menu Wizard 條目中進行了鏈接。如果這造成了任何困擾,我很抱歉。
請不要因選項太多而放棄使用!我猜測(並且我承認我正在猜測!)對於大多數用戶,可能存在幾種非常常見的情況:
顯示整個菜單...
拖曳新的自訂選單小工具,並將其放置在小工具區中。
選擇您要顯示菜單的位置。
選擇菜單列表,並按照需要設置選項。
僅顯示當前頁面所在的位置的菜單內容...
拖曳新的自訂選單小工具,並將其放置在小工具區中。
選擇您要顯示菜單的位置。
選擇相對樹的當前菜單,或定義一個相關某個菜單項目的自訂選項。
外掛標籤
開發者團隊
📦 歷史版本下載
原文外掛簡介
This plugin is a boosted version of the WordPress “Custom Menu” widget.
It provides full control over most of the parameters available when calling WP’s wp_nav_menu() function, as well as providing pre-filtering of the menu items in order to be able to select a specific portion of the custom menu. It also automatically adds a couple of custom classes. And there’s a shortcode that enables you to include the widget’s output in your content.
Important! This plugin provides nothing – zip, zilch, nada, bupkis – in the way of frontend styling! The
appearance of any final output is down to you and your theme, so if you’re just looking for something to re-style
a menu then I’m sorry but this plugin won’t do that!
Features include:
Display an entire menu, just a branch of it, just certain level(s) of it, or even just specific items from it!
Select a branch based on a specific menu item, or the current menu item (currently displayed page)
Specify a relative or absolute level to start at, and the number of levels to output
Include ancestor item(s) in the output, with or without siblings
Exclude certain menu items, or levels of items
Make the output conditional upon the current menu item being found in different stages of the filter selection process
Automatically add cmw-level-N and cmw-has-submenu classes to output menu items
Allow the widget title to be entered but not output, or to be set from the current menu item or selected branch item
Select hierarchical or flat output, both options still abiding by the specified number of levels to output
Specify custom class(es) for the widget block, the menu container, and the menu itself
Modify the link’s output with additional HTML around the link’s text and/or the link element itself
Use Ordered Lists (OL) for the top and/or sub levels instead of Unordered Lists (UL)
Shortcode, [cmwizard], available to run the widget from within content
Shortcode can reference a widget instance, making maintenance of multiple occurences of the same (or very similar) shortcode a lot easier
Interactive “assist” to help with the widget settings and/or shortcode definition
Utility to find posts containing this plugin’s shortcode
Specify an alternative configuration to use under certain conditions (dual-scenario capability)
Current documentation for the Widget Options can be found
under Other Notes.
The associated Shortcode Attributes are documented
under Installation.
You may find that the documentation here is truncated, so I have reproduced the readme.txt
as cmw-doc.html.
This file is also now included in the plugin download, and is linked to from the Custom Menu Wizard entry
on the admin Plugins page.
My apologies if this causes – or has caused – any confusion.
Please, do not be put off by the number of options available! I suspect (and I admit that I’m guessing!) that for the majority of users
there are probably a couple of very common scenarios:
Show an entire menu…
Drag a new Custom Menu Wizard widget into the sidebar, and give it a title (if you want one)
Select the menu you wish to use (if it’s not already selected)
Save the widget!
Equivalent shortcode resembles…
[cmwizard menu=N title=”Your Title”/]
Show the current menu item, plus any descendants…
Drag a new Custom Menu Wizard widget into the sidebar, and give it a title (if you want one)
Select the menu you wish to use (if it’s not already selected)
Open the FILTERS section :
under Primary Filter, click on the Branch radio
Save the widget!
Equivalent shortcode resembles…
[cmwizard menu=N title=”Your Title” branch=current/]
Show just the descendants of the current menu item (if there are any)…
Drag a new Custom Menu Wizard widget into the sidebar, and give it a title (if you want one)
Select the menu you wish to use (if it’s not already selected)
Open the FILTERS section :
under Primary Filter, click on the Branch radio
under Secondary Filter, set Starting at to “+1 (children)”
Save the widget!
Equivalent shortcode resembles…
[cmwizard menu=N title=”Your Title” branch=current start_at=”+1″/]
Always show the top level items, but when the menu contains the current item then also show that current item, with its ancestors and immediate children…
Drag a new Custom Menu Wizard widget into the sidebar, and give it a title (if you want one)
Select the menu you wish to use (if it’s not already selected)
Open the FILTERS section :
under Primary Filter, click on the Branch radio
under Secondary Filter, set Depth to “2 levels” (ie. current item plus immediate children)
under Inclusions, set Branch Ancestors to “to level 1 (root)”, and set Level to “1”
Open the ALTERNATIVE section :
set On condition to “Current Item is NOT in…” and “Menu” (the 2nd dropdown)
in the Then switch settings to textarea, type in “[cmwizard depth=1/]” (without the quotes!)
Save the widget!
Equivalent shortcode resembles…
[cmwizard menu=N branch=current depth=2 ancestors=1 include_level=”1″ alternative=”no-current,menu”]depth=1[/cmwizard]
If you like this widget (or if you don’t?), please consider taking a moment or two to give it a
Review : it helps others, and gives me valuable feedback.
Documentation for version 2 of the widget
can be found here
or here.
WIDGET OPTIONS
There are quite a few options, which makes the widget settings box very long. I have therefore grouped most of the options into
collapsible logical sections (with remembered state once saved).
The associated SHORTCODE ATTRIBUTES are documented
under Installation.
Always Visible
Title (textbox)
Set the title for your widget.
Hide (checkbox)
Prevents the entered Title being displayed in the front-end widget output.
In the Widgets admin page, I find it useful to still be able to see the Title in the sidebar when the widget is closed, but I
don’t necessarily want that Title to actually be output when the widget is displayed at the front-end. Hence this checkbox.
Select Menu (select)
Choose the appropriate menu from the dropdown list of Custom Menus currently defined in your WordPress application. The
first one available (alphabetically) is already selected for you by default.
Filters Section
Filters are applied in the order they are presented.
Primary Filter
Level (radio, default On, & select)
Filters by level within the selected menu, starting at the level selected here. This is the default setting
for a new widget instance, which, if left alone and with all other options at their default, will show the entire selected menu.
Example : If you wanted to show all the options that were at level 3 or below, you could check this radio and set the select to “3”.
Branch (radio & select)
Filters by branch, with the head item of the branch being selected from the dropdown. The dropdown presents all the
items from the selected menu, plus a “Current Item” option (the default). Selecting “Current Item” means that the head item of the
branch is the current menu item (as indicated by WordPress), provided, of course, that the current menu item actually corresponds to
a menu item from the currently selected menu!
Items (radio & textbox)
Filters by the menu items that you specifically pick (by menu item id, as a comma-separated list). The simplest way
to get your list of ids is to use the “assist”, and [un]check the green tick box at the right hand side of each depicted menu item that
you want. Alternatively, just type your list of ids into the box.
If the id is appended with a ‘+’, eg. ’23+’, then all the item’s descendants will also be included.
Example : If you only wanted to show, say, 5 of your many available menu items, and those 5 items are not in one handy branch of the menu,
then you might want to use this option.
Example : If your menu has 6 root branches – “A” thru to “F” – and you were only interested in branches “B” (id of, say, 11) and
“E” (id of, say, 19), you could set Items to be “11+,19+”, which would include “B” with all its descendants, and “E” with all its
descendants.
Secondary Filter (not applicable to an Items filter)
Starting at (select)
This is only applicable to a Branch filter and it allows you to shift the starting point of your output within the confines
of the selected branch. By default it is set to the selected branch item itself, but it can be changed to a relative of the branch item (eg.
parent, grandparent, children, etc) or to an absolute, fixed level within the branch containing the selected branch item (eg. the root
level item for the branch, or one level below the branch’s root item, etc).
Example : If you wanted the entire “current” branch then, with Branch set to “Current Item”, you might set Starting at to “1 (root)”.
Alternatively, if you wanted the children of the current menu item then Starting at could be set to “+1 (children)”.
Item, if possible (radio, default On)
This is the default filter mechanism whereby, if Starting at can only result in a single item (ie. it is the branch item itself, or
an ancestor thereof) then only that item and its descendants are considered for filtering.
Level (radio)
Changes the default filter mechanism such that if Starting at results in the selection of the branch item or one of its ancestors,
then all siblings of that resultant item are also included in the secondary filtering process.
Example : If Joe and Fred are siblings (ie. they have a common parent) and Joe is the selected branch item – with Starting at set
to Joe – then the secondary filter would normally only consider Joe and its descendants. However, if Level was enabled instead of
Item, then both Joe and Fred, and all their descendants, would be considered for filtering.
Note that there is one exception, and that is that if Starting at results in a root-level item, then Allow all Root Items must
be enabled in order to allow the other sibling root items to be added into the filter process.
Allow all Root Items (checkbox)
In the right conditions – see Level above – this allows sibling root items to be considered for secondary filtering.
For Depth (select)
This the number of levels of the menu structure that will be considered for inclusion in the final output (in complete
ignorance of any subsequent Inclusions or Exclusions).
The first level of output is the starting level, regardless of
how that starting level is determined (see Starting at and Relative to Current Item options). So if you ask
for a Depth of 1 level, you get just the starting level; if you ask for a Depth of 2, you get the starting level and
the one below it.
Relative to Current Item (checkbox)
By default, For Depth (above) is relative to the first item found, but this may be overridden to be relative to the
current menu item if For Depth is not unlimited and the current menu item can found within the selected menu.
If the current menu item is not within the selected menu then it falls back to being relative to the first item found.
Please note that the current item must also be within the constraints set by the Starting at option. In other words, if
current item is above the Starting at level in the menu structure then it will not be used to alter the determination of
Depth.
Inclusions
These allow certain other items to be added to the output from the secondary filters.
The first 3 are only applicable to a Branch filter. Please note that they only come into effect when the Branch filter item is at
or below the Starting at level, and do not include any items that would break the depth limit set in the Secondary Filter options.
Branch Ancestors (select)
Include any ancestors (parent, grandparent, etc) of the items selected as the Branch filter.
Ancestors can be set to go up to an absolute level, or to go up a certain number of levels relative to the Branch filter item.
… with Siblings (select)
In conjunction with Branch Ancestors, also include all siblings of those ancestors.
As with Ancestors, their siblings can be set to go up to an absolute level, or to go up a certain number of levels relative
to the Branch filter item. Note that while it is possibe to set a larger range for siblings than ancestors, the final output
is limited by Branch Ancestors setting.
Branch Siblings (checkbox)
Include any siblings of the item selected as the Branch filter (ie. any items at the same level and within
the same branch as the Branch item).
Level (select)
This allows an entire level of items to be included, optionally also including all levels either above or below it.
This replaces the All Root Items checkbox (pre v3.0.4), which only allowed for the inclusion of the root level items.
Exclusions
Item Ids (textbox)
This is a comma-separated list of the ids of menu items that you do not want to appear in the final output.
The simplest way to get your list of ids is to use the “assist”, and [un]check
the red cross box at the left hand side of each depicted menu item. Alternatively, just type your list of ids into the box.
If the id is appended with a ‘+’, eg. ’23+’, then all the item’s descendants will also be excluded.
Example : If you wanted to show the entire “A” branch, with the sole exception of one grandchild of “A”, say “ABC”, then you could
set Branch to “A”, and Exclusions to the id of the “ABC” item.
Example : If you have a menu with 4 root items – “A”, “B”, “C” & “D” – and you wanted to show all items, with descendants, for all bar
the “C” branch, then you could set Level to “1 (root)” and Exclusions to, say, “12+”, where “12” is the menu item id for “C” and
the “+” indicates that all the descendants of “C” should also be excluded.
Level (select)
This allows an entire level of items to be excluded, optionally also excluding all levels either above or below it.
Qualifier
Current Item is in (select)
This allows you to specify that there only be any output shown when/if the current menu item is one of the menu items selected
for output at a particular stage in the filter processing.
“Menu” : the current menu item has to be somewhere within the selected menu.
“Primary Filter” : the current menu item has to be within the scope of the selected primary filter. So if you selected, say, a child
of “A” as the Branch item, then if “A” was the current menu item there would be no output with this qualifier.
“Secondary Filter” : the current menu item has to be within the items as restricted by the secondary filters. So if you
selected Branch as “A”, with Starting at set to “+1 (children)”, then if “A” was the current menu item there would be no output with this qualifier.
“Inclusions” : the current menu item has to be in within the items as set by the primary and secondary filters, and the inclusions.
“Final Output” : the current menu item has to be in the final output.
Fallbacks Section
If Current Item has no children
This gets applied at the Secondary Filter stage, and its eligibility and
application are therefore determined and governed by the other Secondary Filter settings.
It only comes into play (possibly) when a Branch filter is set as “Current Item”, and the Starting at
and For Depth settings are such that the output should start at or below the current item,
and would normally include some of the current item’s descendants
(eg. Starting at “the Branch”, For Depth “1 level” does not invoke the fallback).
The fallback allows for the occasion when the current menu item does not have any immediate children.
Unlabelled Select (select)
Enable the fallback by selecting one of
Start at : -1 (parent) : overrides the Starting at option to be the immediate parent of the Current Item
Start at : the Current Item : overrides the Starting at option to be the Current Item
No output! : self-explanatory
…and Include its Siblings (checkbox)
This will add in the siblings of the item selected above (excluding the “No output!” setting!).
Note : This only adds the siblings, not the siblings’ descendants! However, if the Level radio (in Secondary Filter stage above) is
set, then all the item’s siblings and their descendants will automatically be included, and [un]setting this option will have no effect.
Also note that if the fallback results in a root-level item being selected as the new Starting at item, then the inclusion of siblings
outside the current branch depends on the setting of the Allow all Root Items checkbox.
For Depth (select)
Override the current For Depth setting. Note that any depth value set here will be relative to the current item, regardless
of the current setting of ...Relative to!
As an example, this option may be useful in the following scenario : item A has 2 children, B and C; B is the current menu item but has
no children, whereas C has loads of children/grandchildren. If you fallback to B’s parent – A – with Unlimited depth set, then you will
get A, B, C, and all C’s dependents! You may well want to override depth to limit the output to, say, just A, B and C, by setting this
fallback option to “1”? Or maybe A, B, C, and C’s immediate children, by setting “2”?
If no Current Item can be found
Try items marked Parent of Current (checkbox)
This gets applied right at the start of processing, when determining
which of the menu items (if any) should be regarded as the unique “Current Item” by this widget.
Under certain conditions, WordPress will mark an item as being the parent of a current item …
but there won’t actually be a current item marked! This occurs, for example, when displaying a full post for which there is
no specific related menu item, yet there is a menu item for a Category that the displayed post belongs to :
WordPress will then mark the related Category as being the parent of the current item (the post) even though
it can’t mark the post as being the current item (because there’s no specific item for it within the menu).
Enabling this fallback will make the widget look for these situations – only as a last resort! –
and set (one of) the found “parent” item(s) as the Current Item.
If more than 1 possible Current Item
Use the last one found (checkbox)
Occasionally it is possible for CMW to have more than one possible candidate for Current Item. Since there can only be one
Current Item, CMW picks the first one encountered. However, this may cause a problem where, for example, a root level item and
one of its sub-menu items are both set to list items from Category A, and the page being displayed is a full post that belongs
to category A : CMW will more than likely determine that the root level item is the Current Item, whereas you really need the
sub-menu item to be the Current Item (probably to maintain consistency with what is produced when other sub-menu items are “current”).
Enabling this fallback will make CMW use the last-found (instead of first-found) candidate for Current item, ie. when
the choice is between a submenu item or its parent item, the submenu item will be used.
Note that this option is most likely to only have any effect when the If no Current Item can be found fallback (above) is
enabled, but given that any other plugin/theme could affect the menu item structure that gets passed thru to CMW it is not
impossible for other configurations to also be affected.
Output Section
Hierarchical (radio, default On)
Output in the standard nested list format. The alternative is Flat.
Flat (radio)
Output in a single list format, ignoring any parent-child relationship other than to maintain the same physical order as would be
presented in a Hierarchical output (which is the alternative and default).
Set Title from
These allow you to set the Title option from a menu item, and, if brought into play, the Hide flag is ignored.
Note that the item providing the Title only has to be within the selected menu; it does not have to be present in the final output!
Note also that a Current Item setting will be used in preference to a Branch Item setting.
A relative setting – such as Currrent Item “-2 levels” – will top out at the root-level ancestor (which
could be the Current/Branch Item!) if there aren’t enough ancestors available.
Also, an absolute setting – such as Branch Item “level 4” – will bottom out at the Current/Branch Item
if it’s at/above the absolute level specified.
Current Item (select)
Sets Title from the current menu item (if current menu item is in the selected menu), or an ancestor
of that item, either at an absolute or relative level.
Branch Item *(select)
Only applicable to a Branch filter, and sets Title from the Branch item, or an ancestor
of that item, either at an absolute or relative level.
Make it a Link (checkbox)
If the widget Title does actually get set using one of the options above, then this will
put an anchor around the title, using the information from the menu item that supplies the title.
Change UL to OL
The standard for menus is to use UL (unordered list) elements to display the output. These settings give you the option to
swap the ULs out for OLs (ordered lists).
Top Level (checkbox)
Swap the outermost UL for an OL.
Sub-Levels (checkbox)
Swap any nested (ie. not the outermost) ULs for an OLs.
Container Section
Element (textbox, default “div”)
The menu list is usually wrapped in a “container” element, and this is the tag for that element.
You may change it for another tag, or you may clear it out and the container will be completely removed. Please note that
WordPress is set by default to only accept “div” or “nav”, but that could be changed or extended by any theme or plugin.
Unique ID (textbox)
This allows you to specify your own id (which should be unique) for the container.
Class (textbox)
This allows you to add your own class to the container element.
Classes Section
Menu Class (textbox, default “menu-widget”)
This is the class that will be applied to the list element that holds the entire menu.
Widget Class (textbox)
This allows you to add your own class to the outermost element of the widget, the one that wraps the entire widget output.
Links Section
Before the Link (textbox)
Text or HTML that will be placed immediately before each menu item’s link.
After the Link (textbox)
Text or HTML that will be placed immediately after each menu item’s link.
Before the Link Text (textbox)
Text or HTML that will be placed immediately before each menu item’s link text.
After the Link Text (textbox)
Text or HTML that will be placed immediately after each menu item’s link text.
Alternative Section
This is new at v3.1.0 and provides a limited dual-scenario capability, based on a couple of conditions. For example, let’s say you
want to show the Current Item and its immediate children, but if there isn’t a Current Item then you want to show the top 2 levels
of the menu : previously this was not possible solely with CMW, but now you can configure the main widget settings for the “current item”
scenario, and add an Alternative setting for when no Current Item can be determined.
On condition (2 selects)
Select the appropriate condition for when your Alternative configuration should be used, and also the stage within the
Filter processing when this condition should be tested for (similar to the Qualifier, Current Item is in). You need
values in both selects for the Alternative to be considered.
Then switch settings to (textarea)
This should contain a CMW-generated shortcode equivalent of the configuration that you want to switch to. Please note that leaving
this empty will not prevent the Alternative kicking in if the conditions are set and met! An empty switch to will merely default
to the CMW’s base settings (Level 1, unlimited Depth). Also note that Alternatives cannot be nested : a primary configuration is
allowed one chance to switch and that’s it, so providing an Alternative-that-has-an-Alternative will not work.
The Assist will work with an Alternative – in that it displays the appropriate output – but it can get confusing as to which
configuration set is being used. There is a message displayed whenever the Alternative kicks in (green if successful, red if it
should have kicked in but couldn’t due to an error in the alternative settings) so please take note of it.
A bit more information about the Alternative is available
in this article.